


Interactive Sandbox for Preschool Science Activities
13 ноября 2026 г.
15 ноября 2026 г. в 16:02
First Science Discoveries in Preschool: Exploring Nature with an Interactive Sandbox
First Science Discoveries in Preschool: Exploring Nature with an Interactive Sandbox
How do you explain to a young child why water flows downhill, how rivers find their paths, or where lakes form? A picture can introduce these ideas. But building a mountain, shaping a riverbed, and watching what happens next gives children a different way to explore them.
Early science learning starts with simple questions: “What do you notice?” “What might happen?” “How could we find out?” An interactive sandbox brings these questions into a hands-on activity, combining real sand with digital projections that respond to changes in the landscape.
With a UTS interactive sandbox, educators can turn familiar sand play into an introduction to geography and scientific exploration. Children build, observe, make predictions, and change their designs—all through play.
From Sand Play to Scientific Thinking
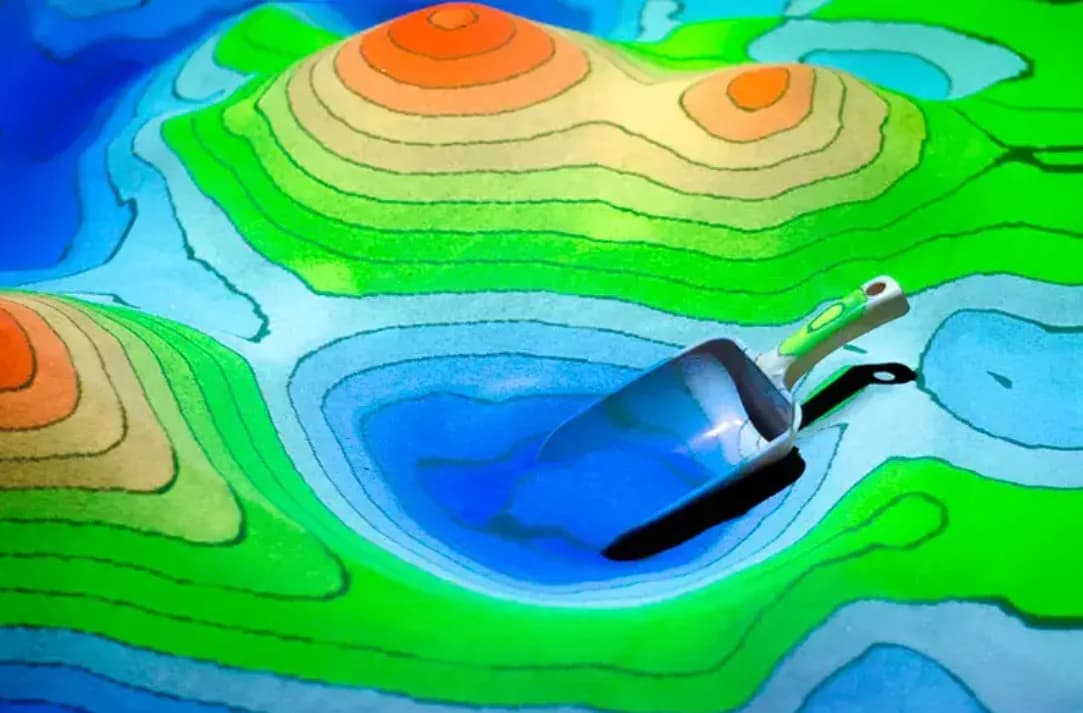
A mound of sand becomes a mountain. A shallow channel becomes a riverbed. A hollow becomes a place where virtual water can collect.
The value of these activities lies not only in what children create, but also in how they investigate it. Instead of receiving an explanation immediately, they can make a prediction, test an idea, and describe what they see.
An educator might ask: “Where do you think the water will go?” After observing the result, the group can change one part of the landscape and try again.
This simple sequence—predict, test, observe, discuss—gives children an opportunity to practise early scientific thinking. They also use spatial language, compare shapes and heights, and explain their ideas to one another.
The digital layer adds a visual representation to the physical landscape. Children still work with real sand, using their hands to build and reshape it. The projected water is a simulation, not real water poured into the sandbox.
Three Simple Activities for Young Explorers
These activities can be used individually or combined into a themed session. The suggested ages and timings are flexible: educators can adapt each task to the group’s interests, experience, and attention span.
Water-based activities require a compatible virtual-water mode in the sandbox’s software.
Activity 1. Build Your Own Mountain
Suggested age: 3–6 years | Activity time: 5–7 minutes
Start with a simple invitation: “Let’s build a mountain.”
Children gather sand into a mound and shape its sides. In a terrain visualisation mode, the projected colours change to represent different elevations, helping children compare higher and lower areas.
Ask the group to build a second mountain next to the first. Is it taller or shorter? What happens to the landscape when they move sand from one mountain to the other?
Next, invite them to create a valley between the mountains or flatten one mound into a plain.
The educator can guide the exploration with questions such as: “What could we do to make this mountain taller?” “Where is the lowest part of our landscape?” “What changes when we remove sand from the top?”
What children explore: height, shape, and the difference between mountains, hills, valleys, and plains.
There is no need to introduce every geographical term at once. Start with familiar words such as “high,” “low,” “steep,” and “flat,” then connect them to the features the children have created.
Activity 2. Make a Path for a River
Suggested age: 4–7 years | Activity time: 7–10 minutes
Invite children to create a channel between two raised areas of sand. Explain that this channel will be their riverbed.
Before using the virtual-water mode, ask everyone to predict the water’s route. Children can point to the areas where they think it will travel or collect.
Then observe the simulation together. Does the water follow the path they expected? Are there low spots where it gathers?
Change one feature at a time. Children might widen the channel, create a bend, or add a small mound across part of the route. Run the activity again and compare the results.
Useful questions include: “Why do you think the water went this way?” “What might happen if we make this part deeper?” “How could we change the landscape to give the water a different path?”
What children explore: the relationship between the shape of the land and the movement of water in the model.
The aim is not to build a perfect river. It is to give children a reason to make a prediction, try something, and reconsider their idea.
Activity 3. Discover Where Water Collects
Suggested age: 4–7 years | Activity time: 7–10 minutes
Ask children to make several hollows in the sand. Some can be shallow, while others are deeper.
Before observing the virtual water, discuss where the group expects a lake to appear. Which areas look as though they could hold water? Which are higher than the surrounding land?
Depending on the available simulation, children can then experiment with changing the height of the edges, removing a barrier, or creating a channel between two hollows.
Ask: “Where has the water collected?” “What do you think will happen if we open a gap here?” “What could we change to connect these two areas?”
What children explore: how low areas and the surrounding landscape influence where water collects.
Give children time to describe the changes in their own words. “The water found a gap” or “It stayed in the deep part” can be a useful starting point for a more detailed conversation.
Turn the Activities into One Learning Session
A theme such as “A Drop of Water’s Journey” can connect the activities into a coherent session.
Begin with a question: “Imagine a drop of rain landing on a mountain. Where might it go next?” The children then create the landscape, predict a route, and explore what happens in the virtual model.
Introduce the question: 3–5 minutes. Talk about mountains, rivers, and lakes. Ask children where they have seen water outdoors and what they noticed about its movement. Use their answers to introduce the challenge: building a landscape for a drop of water to travel through.
Build the landscape: 5–7 minutes. Invite the group to create mountains, valleys, and channels. Encourage children to discuss where each feature should go and identify the highest and lowest parts of their model.
Observe the virtual water: 7–10 minutes. Before starting the simulation, ask children to predict the route. Then watch together and compare their ideas with what happens. Give them time to notice where water moves and where it collects.
Change and test: about 5 minutes. Choose one feature to adjust. Children could lower part of a riverbed, open a gap between two hollows, or add a mound beside a channel. Ask what they expect to change, then test the idea.
Share discoveries: about 3 minutes. Finish by inviting children to describe one thing they noticed. Prompts such as “We thought…,” “We changed…,” and “We discovered…” can help them explain the investigation in their own words.
For younger children, choose just one activity and keep the session shorter. Older preschoolers and primary school pupils can take on a more open-ended challenge, such as creating a route that connects two low areas.
The most important part is not completing every stage. It is leaving enough time for children to notice something, ask a question, and test an idea.
Let Questions Lead the Activity
An interactive sandbox can easily become a demonstration in which the adult operates the equipment while children watch. To make it an investigation, give children meaningful decisions.
Rather than saying, “Build the river here,” ask, “Where could our river go?”
Rather than immediately explaining why the water collected in a particular place, ask, “What do you notice about this part of the landscape?”
When a prediction does not match the result, treat it as a reason to investigate further. “We thought the water would go to the left, but it went to the right. What could we change to test our idea?”
Working in small groups can also help everyone participate. Children can take turns building, predicting, observing, and explaining. The roles do not need to be formal; the aim is to make space for more than the most confident child’s ideas.
One Landscape, Several Learning Opportunities
The same sandbox activity can support conversations across several areas of learning.
Early geography. Children create and identify mountains, valleys, plains, rivers, lakes, and islands. Instead of seeing these features only in a picture, they explore their shapes in three dimensions.
Mathematical language. Building and comparing landscapes gives a practical context for words such as “higher,” “lower,” “deeper,” “wider,” and “narrower.” Educators can ask children to compare two features and explain the difference.
Speaking and listening. Children describe a plan, listen to another suggestion, and explain what happened. A prompt such as “First we changed… Then we noticed…” can help them organise their observations.
Collaboration. Creating one shared landscape requires children to discuss where features should go and how one person’s changes might affect the rest of the model.
For primary school pupils, the same activities can include a simple record of the investigation. Children might draw the landscape before and after a change, mark their predicted water route, or write one sentence about what they observed.
Using an Interactive Sandbox in a Preschool or School
For both public and private educational settings, an interactive sandbox can provide a shared resource for different themes and age groups.
A preschool group might begin by exploring high and low areas. Another group could use the same equipment during a topic on water. A primary class could investigate how changing a channel affects the route shown in the simulation.
The activities can also form part of a longer project. During a “Water Around Us” week, children might build landscapes in the sandbox, look at photographs of real rivers, observe puddles outdoors, and draw their own maps.
These connections matter. A digital simulation is a model of selected features, not a complete representation of nature. It works best alongside real-world observations, books, conversations, and other practical activities.
Educators can make that distinction clear with simple language: “This model helps us explore where water might move. Let’s look for similar shapes outside.”
Small Experiments, Meaningful Discoveries
A child’s first science discovery does not need to begin with a complicated explanation. It can begin with a mound of sand and a question.
“Where will the water go?”
“What happens if we make this part lower?”
“Can we change its path?”
An interactive sandbox gives children a space to explore these questions through their own actions. They build a landscape, observe the response, and try again with a new idea.
For educators, the opportunity is to turn an engaging activity into a thoughtful investigation—one in which children do more than watch. They make predictions, compare results, and begin to explain the world around them.
Bring hands-on exploration into your learning environment. Explore UTS interactive sandbox solutions for preschools, kindergartens, and primary schools.